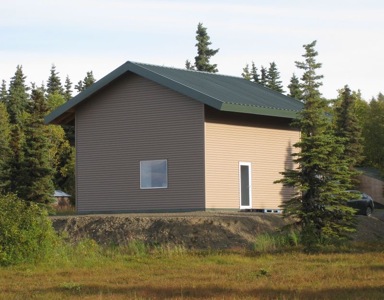
Dr. Tom Marsik, Assistant Professor of Sustainable Energy at University of Alaska Fairbanks Bristol Bay Campus, and his wife, Kristin Donaldson, have built a small, 590 sf, 2 bedroom, 1 bath, Net Zero Ready home in Dillingham, Alaska. The Air Changes per Hour for this home based on a third party-verified blower door test came to 0.05 ACH@50 Pascals –the world’s most air tight home according to the World Record Academy.
This home saves about $4500 per year in energy bills compared to a standard rural Alaskan home.
Dr. Marsik was kind enough to describe how he built this extremely air-tight, energy efficient home, which saves about $4500 per year in energy bills compared to a standard rural Alaskan home.
Zero Homes: Please describe how you attained such extremely low Air Changes Per Hour.
Tom Marsik: The main technique used to achieve this level of air-tightness was the framing technique, which I call the “box-in-a-box” technique. By having the internal “box” as almost an independent structure, there is an easy surface to work with, which we wrapped in plastic sheeting as a vapor and air barrier. Also, thanks to this barrier being on the outside of the inside structure, wiring and plumbing (except for the initial penetrations where they are entering the house) are run through the interior framing without puncturing the vapor/air barrier in places where the traditional cold-climate technique (vapor barrier right underneath the sheetrock) would have punctures (light switches, outlets, etc.). This way the vapor/air barrier is also much less prone to damage by occupants (hanging pictures, etc.).
Zero Homes: Please describe the wall and ceiling assembly in the context of the “box- in-a-box” technique.
Tom Marsik: The inner wall and inner cathedral ceiling are made of 2×4 and 2×8 framing, respectively. 3/8″ plywood sheathing is applied to the outside of this framing. Plastic sheeting was applied on the outside of the plywood sheathing. Fiberglass batts are in the framing of the inner wall and inner ceiling, and are covered with sheetrock on the inside. The plastic wrap extends underneath the floor to create an airtight plastic “bag” on all sides.
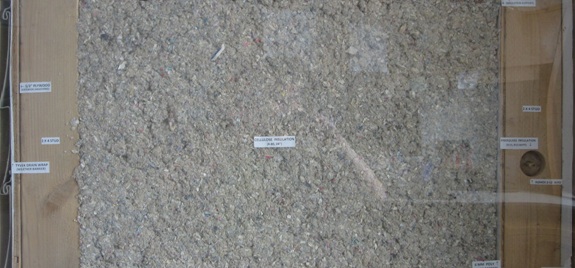
The double walls and double cathedral ceiling allow for ample room for blown-in cellulose between the outside of the inner wall/ceiling and the inside of the outer wall/ceiling. So in addition to the excellent air sealing, this “box within a box” allowed us to achieve very high R-Values: R-90 in the walls and R-140 in the ceiling. Here is a cross section of the 28″ thick wall assembly:
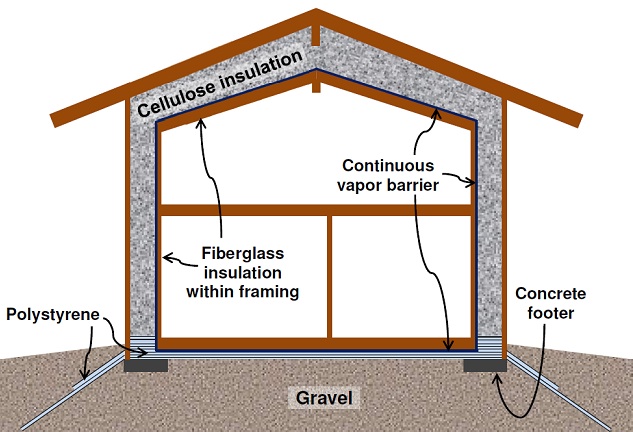
Here is a cross-section of the box within a box construction with the continuous vapor barrier:
Zero Homes: What kind of plastic sheeting did you use, how did you attach it, and what challenges did you face in attaching it and keeping it from ripping?
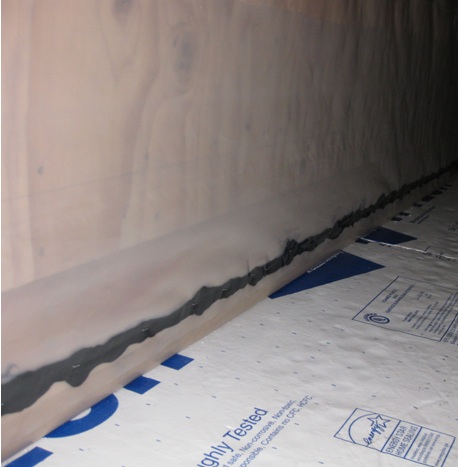
Tom Marsik: Our air/vapor barrier is regular 6 mil polyethylene. It is on the outside of the sheathing (3/8″ plywood) of the inner structure, and it is simply attached by stapling (only at the seams; no attachment elsewhere). The seams are sealed with an acoustical sealant (Tremco) and the staples go through the sealant. We then also taped the seams with red construction tape for a double seal (probably not really necessary, but easy to do). Here is a picture of the seam between the floor poly sheet and the wall poly sheet (picture taken inside the wall cavity):
The challenge was in building the double-frame building (you are basically framing two houses), but once that is done, installing the plastic sheeting as an air/vapor barrier itself is fairly simple. I don’t remember a single rip in it, but if it did rip, I would probably just tape it.
Zero Homes: How did you handle and seal wiring, plumbing, and other penetrations through the wall assembly?
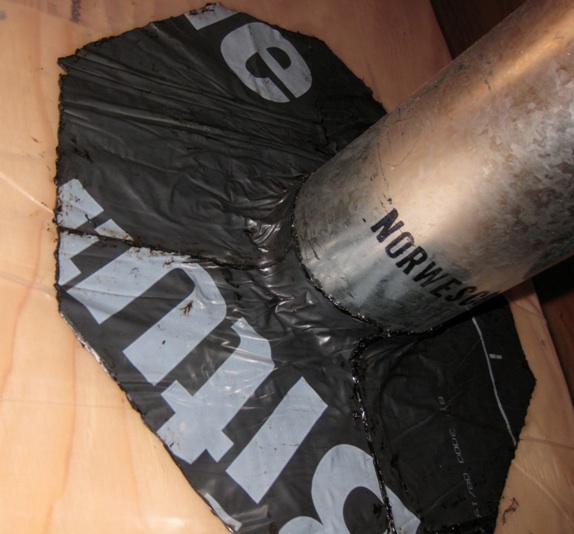
Tom Marsik: As I mentioned, the wiring and plumbing is mostly inside the vapor barrier (in the 2×4 framing). There are a few penetrations (not very many) through the vapor barrier. They are sealed primarily with bituthene (applied with a heat gun to make it stick well). As an example, here is a picture showing how we sealed the HRV vents where they penetrate the vapor barrier:
Zero Homes: What are the risks of condensation occurring on the plastic sheeting?
Tom Marsik: Because of the massive insulation on the outside of the plastic vapor barrier, the temperature of the vapor barrier is above the dew point in basically all situations, thus there is basically no chance for condensation. This assumes proper operation of the HRV, which is taking some of the moisture that has been generated inside the house to the outside (and some of the moisture condenses inside the HRV’s heat exchanger and goes down the drain).
Zero Homes: If your wall thickness was reduced to, say, 12″ for the purposes of use in the northern parts of the lower 48, would there be problems with condensation on the plastic sheeting?
Tom Marsik: A 12″ thick double-stud wall that has plastic on the outside of the inner 2×4 stud wall will have more than 2/3 of the insulation’s R-value on the outside of the vapor barrier and less than 1/3 of the R-value on the inside. That would work well from the perspective of not having condensation in the wall. The 2/3, 1/3 rule is a rule of thumb for Alaska. In warmer climates you can get by with even less than 2/3 of the R-value on the outside of the vapor barrier because the vapor barrier will be staying warmer (thus less chance for condensation) thanks to the warmer outdoor temperature.
Zero Homes: How much extra time and cost was involved in this air-sealing endeavor compared to other techniques?
Tom Marsik: The actual plastic wrap installation is, I think, less costly and less time consuming than most other techniques, mainly because it does not involve the extra work of sealing electric outlets, switches, etc. When it comes to framing the box-in-a-box structure, it’s a different story, though; there is a lot of added cost and time. But that cost and time can’t be attributed just to air sealing because it has other benefits such as minimizing thermal bridging and providing more space for insulation.
Zero Homes: What was your goal and why did you seek such a low ACH50?
Tom Marsik: Our goal was to build a super energy efficient and durable home. Our intention was to demonstrate that we can build super efficient homes even in remote and frigid rural Alaska, where access to materials (and other resources) is very limited. “Keep it simple” was an important principle of our project. So we used common materials as much as we could.
Achieving a high level of air tightness has an effect on both energy efficiency and durability (due to reducing the opportunities for condensation within the wall). With that being said, is it necessary to go down to 0.05 ACH50? Probably not. Our intention was not to build the world’s tightest house, our intention was to build a super energy efficient and durable home, and air-tightness is an important part of that. I personally consider the Passive House’s 0.6 ACH50 criterion a useful guideline and that’s what we were shooting for with our project – we wanted to be below 0.6 ACH50. This standard is difficult to achieve in small homes because of the high ratio of the area of the building envelope to the volume of the house. That’s why we took extra precautions – better to be on the safe side because you won’t know until the blower door test whether or not you did the air-sealing right.
Zero Homes: How can people learn more about how your home was constructed?
Tom Marsik: Please visit Alaska Energy Wiki for a slide presentation, an Alaska Building Science News article, or flicker pictures to learn more about the construction of our home.
Zero Homes: Thanks so much Tom for setting this wonderful example of how homes can be made more airtight!

4rx says:
Great internet site! It looks extremely professional! Sustain the
helpful job! http://bit.ly/2p7LTKb