In cold climates, creating a zero energy building envelope requires going beyond a typical 2×6 insulated wall structure. While creativity abounds in the design of exterior wall assemblies, a couple of basic principles can help builders get the greatest benefit from improved systems at the least cost. First, use an energy model of the building to determine the optimum insulation level, or R value, of the wall system. This involves running different wall options through the energy model for comparison. Second, determine which wall assembly is most cost effective and simple to install. Keeping it simple is the easiest way to reduce cost and smooth the transition to trying something new.
Like beauty, simplicity is in the eye of the beholder. In most cases, the simplest approach is the one that most closely follows what a builder is already doing. Using wood-framed walls with blown dense-pack insulation filling the cavity is usually the best way to keep it simple for builders wanting to improve the energy performance of their wall system.
Structural insulated panels (SIPs) or insulating concrete forms (ICF) are great systems that contribute to robust building envelopes. However, there is a steep learning curve that often leads to a difficult transition from current practice to the entirely new system. Material cost is higher for these products, too. For those eager to try new methods and systems, SIPs and ICFs should be considered. This isn’t meant to be a critique of these systems, it’s just an explanation for why they aren’t featured here as one of the simplest high performance wall systems for builders to adopt as they get on the path to zero.
Three Wood-Framed Wall Systems for Improved Performance
Two of the options below have thick cavities, while the third reduces cavity thickness by adding exterior rigid insulation
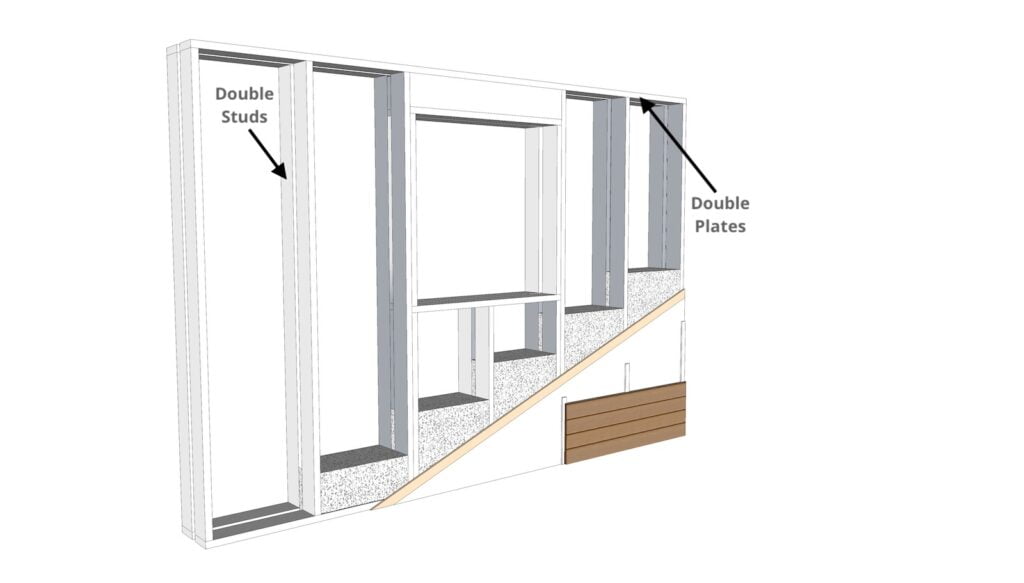
Image Courtesy of Earth Advantage
Double-plate walls have two entirely independent structures, including the top and bottom plates. Framed with 2x4s, the two walls can be spaced to create a variety of wall thicknesses. Early “super-insulated” homes in cold climates often used the double-plate approach for walls that were 16- to 24-inches thick. Because plates and studs are separate, this system eliminates thermal bridging in the wall, although not through floor joists and rafters or roof trusses. Additional framing materials are needed, but most framers need only minor coaching to adapt to this method.
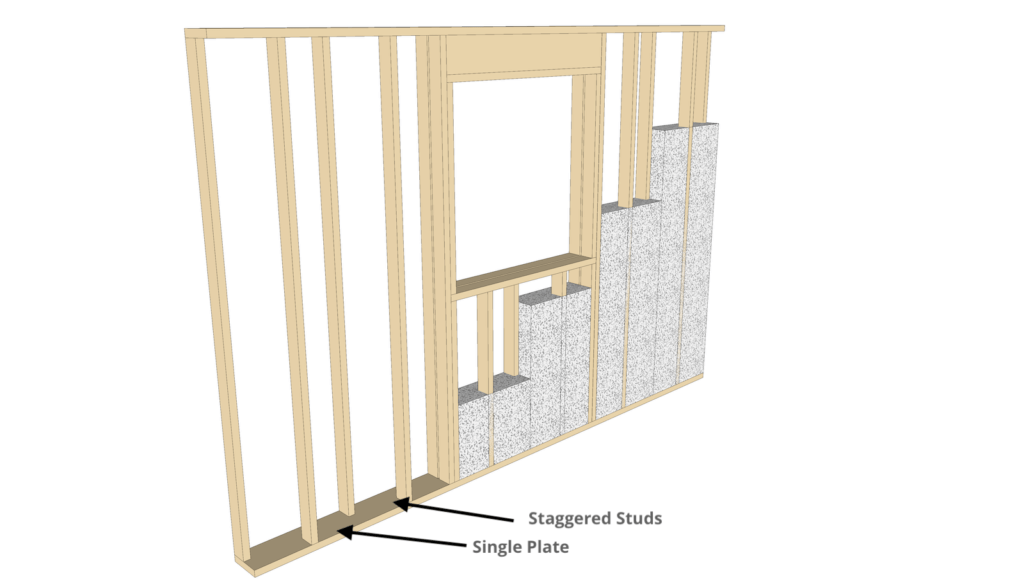
Image Courtesy of Earth Advantage
Staggered stud walls use wider, single top and bottom plates. The most common approach is a 2×8 plate (7.25 inches) with 2×4 studs. The studs are positioned 12 inches apart but every other stud is aligned with either the inside or outside surface of the wall (see the drawing, below). This provides nailing support for drywall and structural sheathing every 24 inches. The thickness of staggered-stud walls is limited to the width of the plate. Almost all builders choose a 2×8, although some find it simpler to use a 2×10. A small amount of thermal bridging occurs because the plates and the rough openings touch both interior and exterior surfaces. The amount of additional framing lumber is lower than the double-plate approach. Again, construction is not much different than what most framers are already doing and they can easily adapt.
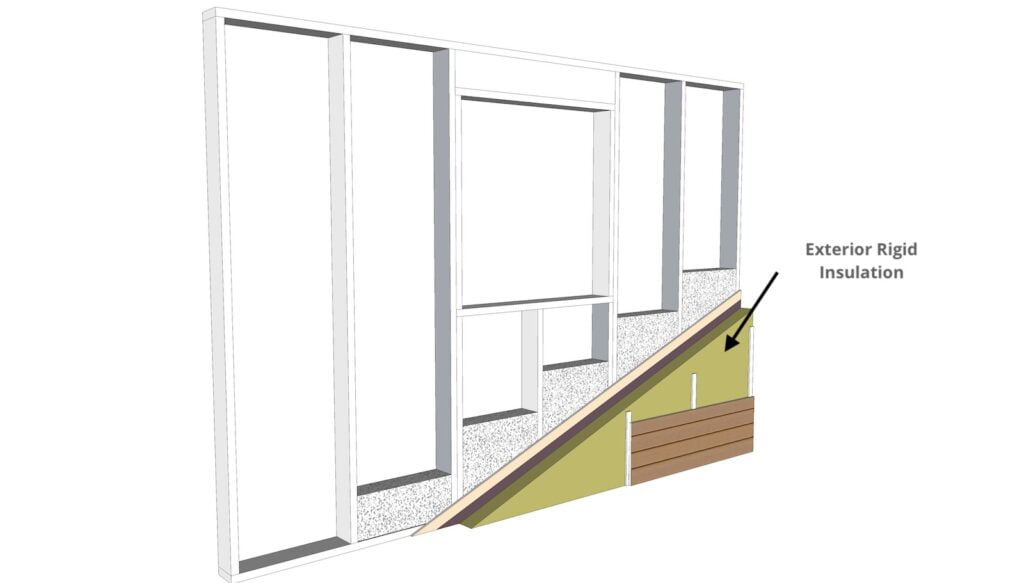
Image Courtesy of Earth Advantage
Exterior rigid insulation can be attached to the exterior surface of a standard 2×4 or 2×6 wall to attain an overall insulating value similar to the systems above. This system has a thermal advantage over thicker wall framing. It blocks all thermal bridges in the wall, plus rim joists at the ground floor and upper levels. Rigid insulation tends to be more expensive than the additional framing and fibrous insulation required in the other systems. Some rigid insulation material, such as extruded polystyrene and polyisocyanurate have a high global warming potential (GWP), while expanded polystyrene is much lower. Other low-GWP rigid insulation, such as Rockwool, is available too. Exterior rigid insulation requires some additional detailing for the weather barrier and flashing at openings. If the rigid insulation thickness is greater than one inch, the insulation must be supported by furring strips. The trades most likely to install exterior rigid insulation are framers or siding installers, and they may need some training in this approach.
Consider Moisture
Moisture accumulation in walls can be a serious issue in many climates, and high-R walls such as these can be more vulnerable. Exterior rigid insulation is the most robust system for preventing moisture accumulation, especially in cold climates and moist coastal areas. In dry climates, thick walls with only dense-pack insulation can be protected from moisture problems using three common methods. First, use a vapor retarder on the interior surface with a Perm rating of around 1.0 to allow a small amount of vapor diffusion to the inside. This might be a vapor retarder paint or a “smart” membrane. Second, meticulous air sealing of the interior drywall will greatly reduce water vapor transmission into wall cavities through air leakage. It’s a very cost effective way to reduce heat loss, too. Third, manage interior humidity levels through effective, controlled ventilation or dehumidification.
Choose Your R-value
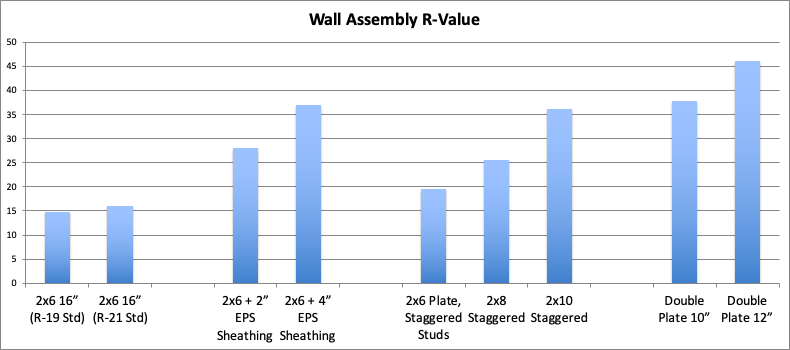
How thick is thick enough? That depends on the climate, the building design, and many other design details. The question of the optimum wall R-value is best answered with an energy model that quantifies the choices. Due to the diminishing returns of thicker wall insulation, there is generally an upper limit on the cost effectiveness of increasing wall thickness. This example shows how the three different wall systems compare for an actual construction project now being designed.
R-value of Typical Wall Types
This chart illustrates that each type of advanced wall assembly — double-plate 10”, staggered stud 10”, and insulated sheathing with 4” of EPS — reach a roughly similar insulating value and all are considerably better than a typical 2×6 code wall.
Key Choice Factors
In instances such as this, where the three wall types (double-plate, staggered stud, and insulated sheathing) can achieve roughly the same efficiency goal, the choice comes down to other factors. Material and labor cost is an obvious place to start. In some areas, moisture management should be a key factor, too. In the past, rigid foam insulation has been the most expensive material. Plus it requires a steeper learning curve with more new detailing and new skills to learn. Nevertheless, it has become a popular option in many markets, especially in more humid climates, because it is easier to manage moisture and thermal bridging.
Recently, the cost of lumber has skyrocketed, undermining the material cost advantage for thicker framing approaches. Since most framers can easily adapt to these framing techniques, lower labor cost remains an advantage, which needs to be weighed against the lumber use. Construction costs ebb and flow with market conditions and geographic location. There’s no way to generalize the best approach for every project, in every climate and every materials and labor market. It’s a budgeting consideration that must be assessed for each project in each weather zone and each materials price environment.
Keep it Simple
In many ways, “simple” is what the builder is already doing. Since these three wall types can achieve very similar heat loss, the choice is less about energy performance as much as it is about a builder’s process, supply chain, skill base, construction cost, moisture concerns, and other factors – all of which play into the cost-effectiveness of wall assembly. So when choosing a wall assembly, keep it simple by selecting the one that works best for your situation. Whatever wall system you choose on your path toward zero, the time to start is now.

Jeff Nice says:
I have built with SIP’s and with Exterior Rigid Insulation. Apparently the author has not. The double wall plate systems mentioned in this article double the wood and manpower required to build all exterior walls and its still not insulated, electricians still have to drill holes for power, etc. The author suggests a “steep learning curve” with SIP yet for my 2800 sq ft house I used 4 inexperienced high school kids and they entire structure was erected and completely weathered-in in less than 2 weeks with factory electrical conduits in all exterior walls. The SIP panels are numbered so even high school kids with no construction experience know where each panel goes. Before installing HVAC the temps dropped below freezing and was also above 100 degrees but the inside temperatures never drop below 50 degrees and never get above 85 degrees. Its an air tight house and comparing my house to my neighbors I have calculated my cost to heat and cool at about 5 cents per square foot whereas my neighbors with the “Energy Package” cost 9 cents per month. You can build with all the efficient appliances, fixtures, doors and windows but if your house leaks like you have a barn door open, your just being sold a bunch of energy efficient stuff while overlooking the biggest leak of all, your walls. Who can afford spray foam insulation after buying twice as much lumber and labor? The author asks “How thick is too thick?” when they should be asking what materials must I use to stop the thermal leaks in my walls and roof without doubling my materials cost and manpower for construction?
Bruce Sullivan says:
You make some good points. The fact is that there are many paths to reach the necessary wall R-values. SIPs have advantages, but most builders stick with what they know, which is stick framing. An issue that you don’t mention is cost. For a given plan, SIPs will usually have a higher material cost than stick framing. Of course, the savings come in the lower time and labor to reach a weather-tight enclosure. If time is the top priority this makes sense. Often it is not, and stick framing still comes in less expensive for the same level of insulation value.
Tiff Gregers says:
How great that you talk about how wood-framed wall systems can improve performance. I am starting a new business this year. I will also find a great wall frame service to help.